I am super excited to start teaching "My Heavenly Father Loves Me." This is one of my favorite all-time primary songs. I have sung this song with the children before, using flip charts, but this time, thanks to a wonderful idea by Wendy Olsen Buchanan (well, her mother actually), I created this rotating earth flip chart:
But first, I want to share the flip chart and idea from Wendy that I knew I had to duplicate. This line cemented the fact that I would make it, too: "It's always been a favorite visual aid of the primary kids."
Wendy shared, "I can't take any credit for the visual aid because my mom made it years and years ago. (Lucky me, she laminated all her amazing visual aids and now I get to use them!) It's two poster boards, cut into circles and held together by a brad. The back poster is divided into 8 sections, 4 for each verse. She drew the pictures freehand. It's always been a favorite visual aid of the primary kids-- maybe because it's different from the normal posters or flip charts."
For my version, I used acrylics instead of markers since I knew I would have to paint a lot of blue onto my poster. I did this entirely with supplies I already had on hand.
I used green poster board (because I did not have any blue or white poster board) and painted in the blue ocean. First, I traced giant circles onto my green poster board and onto a piece of cardboard for my two sides. I wanted to make sure to use cardboard to make this visual aid stronger, so that it didn't flop around when I was holding it.
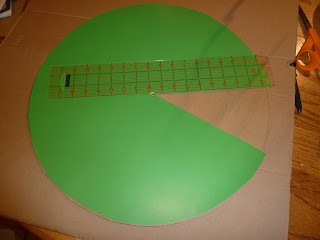
While my blue paint dried, I cut out the wedge from the earth, sketched out some land masses, and painted a blue ocean onto my green poster. I had some thin packaging paper on hand so I cut out a third circle, folded it in quarters, and used that to find the center of the circle so that my wedge was somewhat even. Make sure not to cut your wedge too close to the brad or the brad will tear out of the center.
Then, I used a pin to poke a hole into the center of the two circles, and attached them together with a brad. This way, I knew I wouldn't mess up how much space I had to draw. I drew all my pictures freehand onto the cardboard, spinning the top circle as I went and drawing within the wedge. I then separated the pieces of cardboard again to paint everything.
Then, I painted everything, let it dry, and reattached my circles. That's it! I fit in eleven pictures overall. The acrylics worked beautifully. I think I could have done this in one hour if I had cut out pre-made pictures instead of painting everything. I was thinking that a person could even purchase colored paper for the earth, and cut and glue that on the earth. For me, painting was the most satisfying route but I can picture all the lovely vivid images I could have cut out from magazines or printed out.
But first, I want to share the flip chart and idea from Wendy that I knew I had to duplicate. This line cemented the fact that I would make it, too: "It's always been a favorite visual aid of the primary kids."
Wendy shared, "I can't take any credit for the visual aid because my mom made it years and years ago. (Lucky me, she laminated all her amazing visual aids and now I get to use them!) It's two poster boards, cut into circles and held together by a brad. The back poster is divided into 8 sections, 4 for each verse. She drew the pictures freehand. It's always been a favorite visual aid of the primary kids-- maybe because it's different from the normal posters or flip charts."
For my version, I used acrylics instead of markers since I knew I would have to paint a lot of blue onto my poster. I did this entirely with supplies I already had on hand.
I used green poster board (because I did not have any blue or white poster board) and painted in the blue ocean. First, I traced giant circles onto my green poster board and onto a piece of cardboard for my two sides. I wanted to make sure to use cardboard to make this visual aid stronger, so that it didn't flop around when I was holding it.
Next, I painted my cardboard blue, using a sponge brush so that I could do this part quickly.
While my blue paint dried, I cut out the wedge from the earth, sketched out some land masses, and painted a blue ocean onto my green poster. I had some thin packaging paper on hand so I cut out a third circle, folded it in quarters, and used that to find the center of the circle so that my wedge was somewhat even. Make sure not to cut your wedge too close to the brad or the brad will tear out of the center.
Then, I used a pin to poke a hole into the center of the two circles, and attached them together with a brad. This way, I knew I wouldn't mess up how much space I had to draw. I drew all my pictures freehand onto the cardboard, spinning the top circle as I went and drawing within the wedge. I then separated the pieces of cardboard again to paint everything.
Then, I painted everything, let it dry, and reattached my circles. That's it! I fit in eleven pictures overall. The acrylics worked beautifully. I think I could have done this in one hour if I had cut out pre-made pictures instead of painting everything. I was thinking that a person could even purchase colored paper for the earth, and cut and glue that on the earth. For me, painting was the most satisfying route but I can picture all the lovely vivid images I could have cut out from magazines or printed out.


